
When making Christmas nativity costumes I recommend one simple pattern that works for Mary, Joseph, shepherds, angels, and wise men. It is McCall’s # 2339 easy-to-sew Christmas costume pattern. I didn’t want to put crowns on my wise men, however, and hunted for other alternatives. After using various ideas for wise men hats over the years, I recommend two simple styles of hats that can be made in many variations.
You can make your hats look rich and impressive by choosing fabrics that are rich in color and texture. Velvet drape scraps work great for this. Then scrounge around for buttons, pins or jewelry that are shiny and flashy. Cord trim also works well for the tube hats.


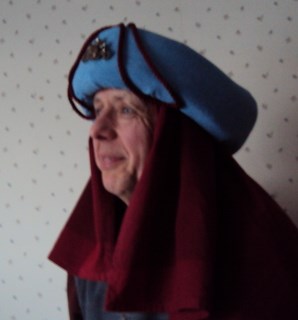
Band Hat
The band hat is made from a simple band of fabric, looped end over end, and sewn into a ring. Sound boring? It doesn’t have to be. The three band hats in the above photos are all made using the same principle.
The instructions are simple.
-
Cut your fabric.
To make a band hat you’ll need a strip of fabric long enough to go around the head and lap over the edge a bit. You can make the width as wide as you want. Option A: Allow extra for a narrow hem on the backside. (See top finished band in the photo.) Option B: Double the width and add seam allowance if you want to cover the inside of the band. (See bottom finished band in the picture.) If you want to make pleats you’ll need extra fabric for the width.
Also, cut a band of stiff fabric to edge the fabric on the inside and make the hat stiffer. Stiff denim would work well for this.
-
Sew the basic band.
If you want a pleated look, pin pleats lengthwise into the fabric and iron in place. Sew across the end of the band to hold the pleats in place. (The top and bottom photos each feature hats with pleats in them.)
Option A: Sew the fabric which will be visible to the stiff interior band. Finish the long sides by turning the edge of the outside fabric to the inside and stitch in place by hand or topstitch along the edge.
Option B: Sew the fabric which will be visible to the stiff interior band on the backside. Fold the fabric around the band, keeping the stiff interior band on the inside of the bottom edge, then fold the top around so that you establish the width of the hat and the extra fabric extends over the back enough to lap over the edge of the fabric in the back. Iron the top and bottom edges. Topstitch edges if desired. Hand stitch the seam along the back.
Finish the edges of the ends with a zig-zag stitch or a narrow hem. This gives you a simple band of fabric.
-
Sew band into a ring.
Measure the head for the right circumference. Then form a ring with the band to fit that circumference and stitch one end over the other.
-
Add buttons, pins, fake jewels, or other accessories to add glitz.


Tube Hat
The tube hat is also simple to make.
-
Cut fabric into a rectangle about 32 inches x 10 inches (80 cm x 25 cm).
-
Make a tube.
Fold the long edges together, right sides together, to make a long, narrow tube. Turn the tube right-side out and stuff with polyester batting.
-
Sew into a ring.
Place one end over the other and sew the tube together to make a ring.
-
Add buttons, cord, fake jewels, or other accessories to add glitz.
If desired add a head scarf underneath it.
Have fun making these simple hats. May your “wise men” enjoy wearing them and your program honor God.
Hopefully, my MIS-adventures will help someone else!!! I tried to cheat on my tube hat and thought since I was making this for a child, I needed less length and width. I cut my fabric at 24 x 8. The width is fine, however once stuffed…. I lose my length. I have a small head and it BARELY will fit me once sewn up… instructions (and measurements) are there for a reason, who knew! 😉 and the second mis-adventure….. I sewed my tube, then remembered my chiffon drape, opened up my seam then second guessed myself and sewed the chiffon on the wrong side – so when I went to turn it right side out, my chiffon was on the inside and not able to be seen! Take…3, I opened up my seam placed my chiffon inside (right sides together)and re-stitched it!! Chiffon hangs nicely! now, to fix my length issue… 🙁
Thanks for your comment, Robin. Some things you just learn by doing.